# capsulflask
Python Flask web application for capsul.org
## how to run locally
Ensure you have the pre-requisites for the psycopg2 Postgres database adapter package
```
sudo apt install python3-dev libpq-dev
pg_config --version
```
Ensure you have the wonderful `pipenv` python package management and virtual environment cli
```
sudo apt install pipenv
```
Create python virtual environment and install packages
```
# install deps
pipenv install
```
Run an instance of Postgres (I used docker for this, you can use whatever you want, point is its listening on localhost:5432)
```
docker run --rm -it -e POSTGRES_PASSWORD=dev -p 5432:5432 postgres
```
Create a `.env` file to set up the application configuration:
```
nano .env
```
Enter your SMTP credentials like this:
```
MAIL_USERNAME=forest@nullhex.com
MAIL_DEFAULT_SENDER=forest@nullhex.com
MAIL_PASSWORD=**************
```
Run the app
```
pipenv run flask run
```
Run the app in gunicorn:
```
pipenv run gunicorn --bind 127.0.0.1:5000 -k gevent --worker-connections 1000 app:app
```
## how to view the logs on the database server (legion.cyberia.club)
`sudo -u postgres pg_dump capsul-flask | gzip -9 > capsul-backup-2021-02-15.gz`
-----
## cli
You can manually mess around with the database like this:
```
pipenv run flask cli sql -f test.sql
```
```
pipenv run flask cli sql -c 'SELECT * FROM vms'
```
This one selects the vms table with the column name header:
```
pipenv run flask cli sql -c "SELECT string_agg(column_name::text, ', ') from information_schema.columns WHERE table_name='vms'; SELECT * from vms"
```
How to modify a payment manually, like if you get a chargeback or to fix customer payment issues:
```
$ pipenv run flask cli sql -c "SELECT id, created, email, dollars, invalidated from payments"
1, 2020-05-05T00:00:00, forest.n.johnson@gmail.com, 20.00, FALSE
$ pipenv run flask cli sql -c "UPDATE payments SET invalidated = True WHERE id = 1"
1 rows affected.
$ pipenv run flask cli sql -c "SELECT id, created, email, dollars, invalidated from payments"
1, 2020-05-05T00:00:00, forest.n.johnson@gmail.com, 20.00, TRUE
```
How you would kick off the scheduled task:
```
pipenv run flask cli cron-task
```
-----
## postgres database schema management
capsulflask has a concept of a schema version. When the application starts, it will query the database for a table named
`schemaversion` that has one row and one column (`version`). If the `version` it finds is not equal to the `desiredSchemaVersion` variable set in `db.py`, it will run migration scripts from the `schema_migrations` folder one by one until the `schemaversion` table shows the correct version.
For example, the script named `02_up_xyz.sql` should contain code that migrates the database from schema version 1 to schema version 2. Likewise, the script `02_down_xyz.sql` should contain code that migrates from schema version 2 back to schema version 1.
**IMPORTANT: if you need to make changes to the schema, make a NEW schema version. DO NOT EDIT the existing schema versions.**
In general, for safety, schema version upgrades should not delete data. Schema version downgrades will simply throw an error and exit for now.
-----
## hub-and-spoke architecture
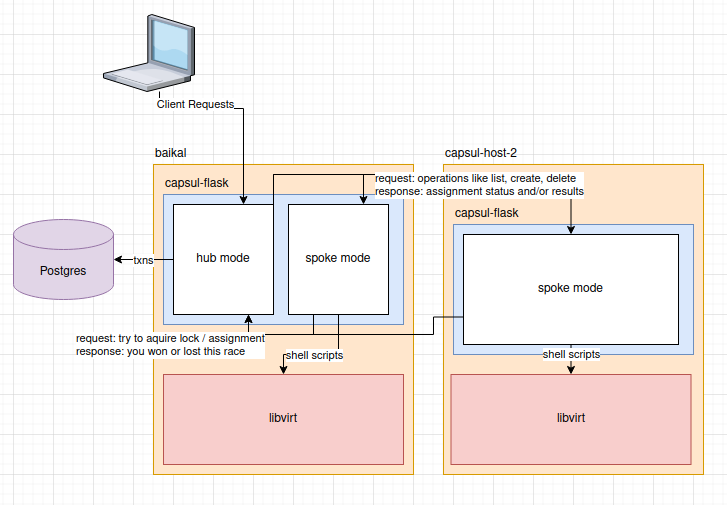
This diagram was created with https://app.diagrams.net/.
To edit it, download the diagram file and edit it with the https://app.diagrams.net/ web application, or you may run the application from [source](https://github.com/jgraph/drawio) if you wish.
right now I have 2 types of operations, immediate mode and async.
both types of operations do assignment synchronously. so if the system cant assign the operation to one or more hosts (spokes),
or whatever the operation requires, then it will fail.
some operations tolerate partial failures, like, capacity_avaliable will succeed if at least one spoke succeeds
for immediate mode, assignment and completion of the operation (like `list`, `capacity_avaliable`, `destroy`) are the same thing
for async ones, they can be assigned without knowing whether or not they succeeded (`create`)
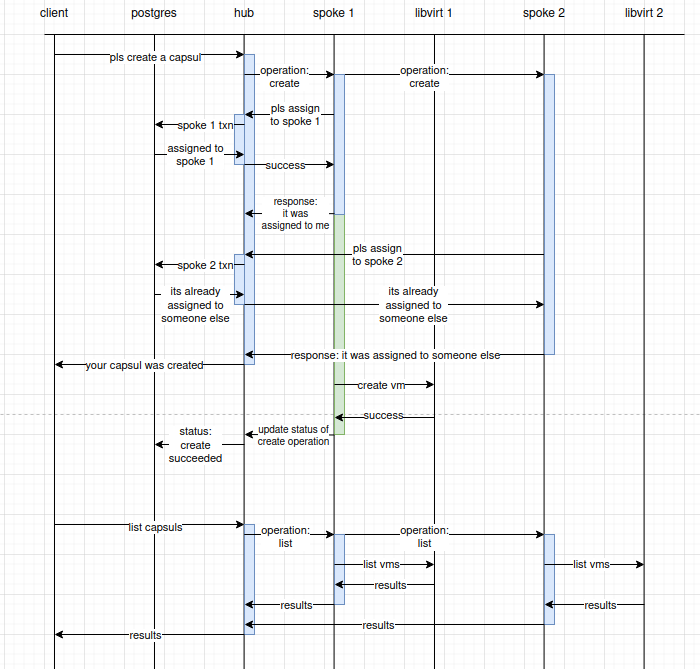
This diagram was created with https://app.diagrams.net/.
To edit it, download the diagram file and edit it with the https://app.diagrams.net/ web application, or you may run the application from [source](https://github.com/jgraph/drawio) if you wish.
if you issue a create, and it technically could go to any number of hosts, but only one host responds, it will succeed
but if you issue a create and somehow 2 hosts both think they own that task, it will fail and throw a big error. cuz it expects exactly 1 to own the create task
currently its not set up to do any polling. its not really like a queue at all. It's all immediate for the most part
-----
## how to setup btcpay server
Generate a private key and the accompanying bitpay SIN for the btcpay API client.
I used this code as an example: https://github.com/bitpay/bitpay-python/blob/master/bitpay/key_utils.py#L6
```
$ pipenv run python ./readme/generate_btcpay_keys.py
```
It should output something looking like this:
```
-----BEGIN EC PRIVATE KEY-----
EXAMPLEIArx/EXAMPLEKH23EXAMPLEsYXEXAMPLE5qdEXAMPLEcFHoAcEXAMPLEK
oUQDQgAEnWs47PT8+ihhzyvXX6/yYMAWWODluRTR2Ix6ZY7Z+MV7v0W1maJzqeqq
NQ+cpBvPDbyrDk9+Uf/sEaRCma094g==
-----END EC PRIVATE KEY-----
EXAMPLEwzAEXAMPLEEXAMPLEURD7EXAMPLE
```
In order to register the key with the btcpay server, you have to first generate a pairing token using the btcpay server interface.
This requires your btcpay server account to have access to the capsul store. Ask Cass about this.
Navigate to `Manage store: Access Tokens` at: `https://btcpay.cyberia.club/stores//Tokens`

Finally, send an http request to the btcpay server to complete the pairing:
```
curl -H "Content-Type: application/json" https://btcpay.cyberia.club/tokens -d "{'id': 'EXAMPLEwzAEXAMPLEEXAMPLEURD7EXAMPLE', 'pairingCode': 'XXXXXXX'}"
```
It should respond with a token:
```
{"data":[{"policies":[],"pairingCode":"XXXXXXX","pairingExpiration":1589473817597,"dateCreated":1589472917597,"facade":"merchant","token":"xxxxxxxxxxxxxxxxxxxxxxxxxxxxxxxxxxxxxxxxxxxx","label":"capsulflask"}]}
```
And you should see the token in the btcpay server UI:
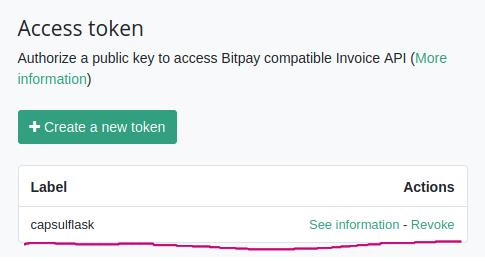
Now simply set your `BTCPAY_PRIVATE_KEY` variable in `.env`
NOTE: make sure to use single quotes and replace the new lines with \n.
```
BTCPAY_PRIVATE_KEY='-----BEGIN EC PRIVATE KEY-----\nEXAMPLEIArx/EXAMPLEKH23EXAMPLEsYXEXAMPLE5qdEXAMPLEcFHoAcEXAMPLEK\noUQDQgAEnWs47PT8+ihhzyvXX6/yYMAWWODluRTR2Ix6ZY7Z+MV7v0W1maJzqeqq\nNQ+cpBvPDbyrDk9+Uf/sEaRCma094g==\n-----END EC PRIVATE KEY-----'
```
-----
## testing cryptocurrency payments
I used litecoin to test cryptocurrency payments, because its the simplest & lowest fee cryptocurrency that BTCPay server supports. You can download the easy-to-use litecoin SPV wallet `electrum-ltc` from [github.com/pooler/electrum-ltc](https://github.com/pooler/electrum-ltc) or [electrum-ltc.org](https://electrum-ltc.org/), set up a wallet, and then either purchase some litecoin from an exchange, or ask Forest for some litecoin to use for testing.
## sequence diagram explaining how BTC payment process works
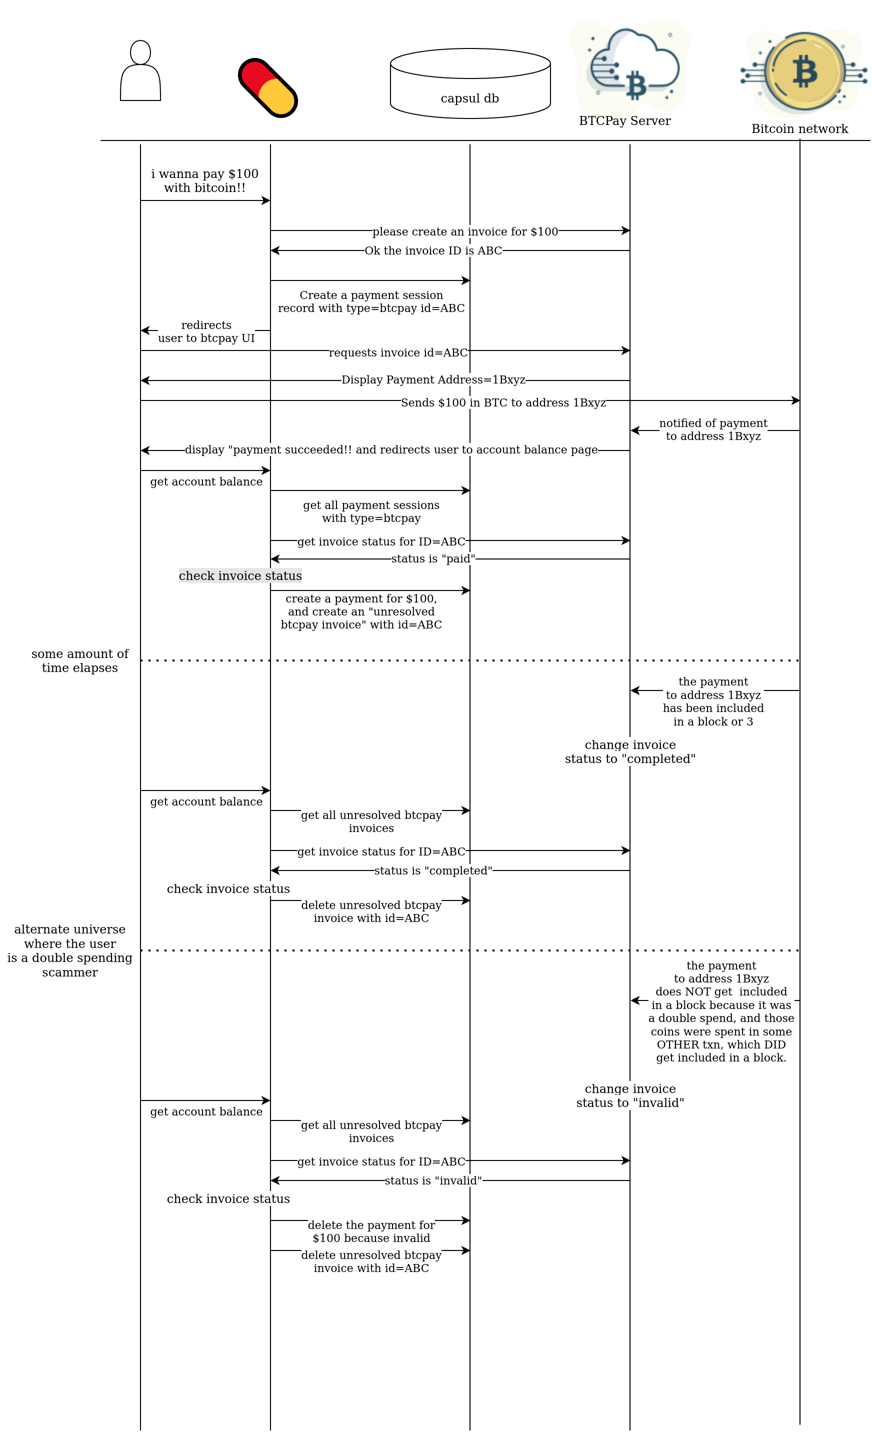
This diagram was created with https://app.diagrams.net/.
To edit it, download the diagram file and edit it with the https://app.diagrams.net/ web application, or you may run the application from [source](https://github.com/jgraph/drawio) if you wish.